
Septic tank installation is a complex process that requires careful planning, precise execution, and adherence to local regulations. This comprehensive guide will walk you through everything you need to know about installing a new septic system.
When it comes to managing household waste, few installations are as crucial as your septic system. This essential infrastructure represents a significant investment in your property and, when done correctly, provides decades of reliable service. Let’s break down every aspect of the installation process to ensure you’re fully informed before embarking on this important project.
What is septic tank installation and how do I get it right? Septic tank installation allows you to manage household waste as an alternative to typical municipal sewage. You have to choose the right tank type, ensuring the proper size, and work with licensed professionals who understand local regulations and soil conditions. A complete installation might take between 3-8 weeks and cost between $5,000 – $20,000 or more involving multiple steps from site evaluation to permits to construction.
Understanding Septic Tank Types
Before you can begin digging or calling contractors, you’ll need to understand the different types of septic tanks available. Each comes with its own set of advantages and considerations, and choosing the right one for your property can mean the difference between decades of trouble-free service and years of headaches. Let’s explore your options:
Before installation begins, you’ll need to choose the right type of tank:
Conventional Septic System
A conventional septic system is one of the most common and widely used options.
It consists of a large underground tank, typically made of plastic or metal, that works alongside a drain field to treat and dispose of wastewater. This system is a standard choice due to its simplicity, effectiveness, and affordability. It is often the best option for homeowners seeking a reliable and cost-effective septic solution.
Chamber System
A chamber septic system is a type of system that uses a trench distribution method with larger-than-average trenches.
Wastewater moves through the septic tank and into the soil, where it undergoes natural treatment before reaching the groundwater. This system is a good alternative to conventional septic systems, particularly in areas with variable soil conditions.
Drip Distribution System
A drip distribution system, also called a pressure distribution system, is designed for more precise wastewater dispersal.
This system requires a significant amount of piping but involves minimal landscape disruption during installation. It uses a pump chamber to evenly distribute wastewater through small pipes, allowing it to be treated effectively in the soil.
Aerobic Treatment Unit
An aerobic treatment unit (ATU) is an advanced septic system that enhances bacterial activity to improve waste breakdown.
It uses an air pump to introduce oxygen into the tank, accelerating the decomposition process and making the system more efficient than standard septic tanks. ATUs are highly effective at treating wastewater but require more maintenance and come at a higher cost than conventional systems.
Mound System
A mound system is a septic solution designed for areas where soil conditions are not ideal for traditional underground systems.
It consists of a sand-based filtration system built into an elevated mound, allowing wastewater to be treated before reaching the groundwater. This system is particularly useful in areas with high water tables or poor soil drainage.
Recirculating Sand Filter System
A recirculating sand filter system adds an extra level of filtration to the standard septic process.
It includes two septic tanks and a sand filter to further treat wastewater before it reaches the final dispersal stage. This system provides enhanced treatment and can be used with various drain field designs.
Septic Tank Materials
Septic tanks come in a few common materials, each with its pros and cons. Concrete is sturdy and long-lasting but can crack over time. Plastic is lightweight and easy to install but may shift if the soil isn’t stable. Fiberglass resists corrosion and won’t crack like concrete, though it can be pricier. Steel was once popular but tends to rust over time, making it less common today. The choice mostly comes down to budget, soil conditions, and how long you want the system to last.
Plastic/Polyethylene Tanks
- Lightweight and easier to install
- Cost: $1,000-$2,000 for the tank
- Less prone to cracking
- Can shift in saturated soil conditions
- 20-30 year lifespan
Concrete Tanks
These heavyweight champions of the septic world are like underground bunkers for your waste, lasting up to 40 years when properly installed.
- Most common and durable (30-40 year lifespan)
- Cost: $2,000-$4,000 for the tank alone
- Resistant to environmental pressures
- Can crack if improperly installed
- Heavier, requiring larger equipment for installation
Fiberglass Tanks
- Lightweight yet durable
- Cost: $1,500-$2,500 for the tank
- Resistant to corrosion
- Less likely to crack than concrete
- 30-40 year lifespan
Tank Size Requirements

Selecting the right size tank isn’t just about meeting current needs – it’s about planning for the future while complying with local regulations. An undersized tank can lead to system failures and costly replacements, while an oversized one represents wasted money and space. Here’s how to determine the perfect size for your situation:
Tank size depends on several factors:
- Number of bedrooms (primary factor)
- Square footage of home
- Number of occupants
- Local regulations
Typical size guidelines:
- 2 bedrooms: 750-1,000 gallons
- 3 bedrooms: 1,000-1,250 gallons
- 4 bedrooms: 1,250-1,500 gallons
- 5+ bedrooms: 1,500+ gallons
The Installation Process Step by Step
Installing a septic system is a complex orchestration of planning, timing, and expertise. Think of it as a carefully choreographed dance where each step must be performed in the right sequence and with precision. Understanding this process helps you better manage the project and ensure quality results. Here’s what to expect:Site Evaluation (1-2 weeks)
- Soil percolation testing
- Water table assessment
- Property survey
- Local code review
- Permit acquisition
- Cost: $300-$1,000
System Design (1-2 weeks)
- Engineering plans
- Health department approval
- Layout specifications
- Cost: $600-$2,000
Site Preparation (1-2 days)
- Clearing vegetation
- Marking utilities
- Creating access for equipment
- Cost: $500-$1,500
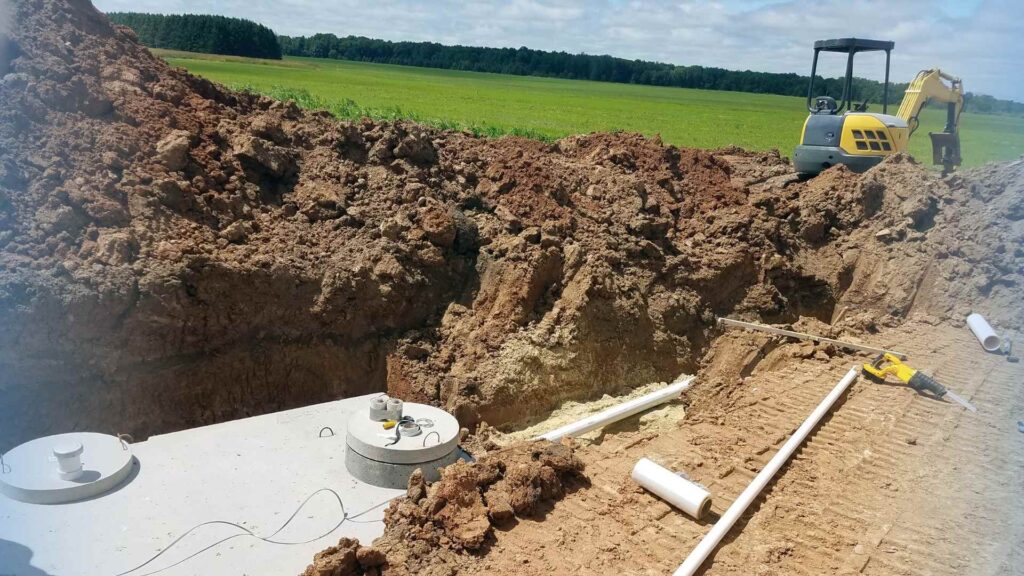
Tank Installation (2-3 days)
- Excavation
- Tank placement
- Connection to house plumbing
- Installation of risers and lids
- Cost: $2,000-$4,000
Drain Field Installation (2-4 days)
- Trenching
- Pipe laying
- Gravel placement
- Soil coverage
- Cost: $3,000-$10,000
Final Inspection (1 day)
- Health department review
- System testing
- Documentation
- Cost: $200-$400
Total Timeline: 3-8 weeks
Total Cost Range: $10,000-$25,000
Factors Affecting Installation Cost

Money matters when it comes to septic installation, and understanding what drives costs helps you budget effectively and avoid surprises. From geographical considerations to system complexity, numerous factors influence your final price tag. Let’s examine what affects your bottom line:
Location Factors
- Property accessibility
- Soil conditions
- Local labor rates
- Permit costs
- Distance from suppliers
System Complexity
- Tank size and material
- Drain field size
- Pumping requirements
- Additional components needed
Site Conditions
- Slope of property
- Rock removal needs
- Tree removal
- Water table issues
Common Installation Mistakes to Avoid
Even experienced contractors can make mistakes, but knowing the common pitfalls helps you avoid costly errors and ensure a properly functioning system. These mistakes aren’t just about immediate problems – they can affect your system’s performance for years to come. Here are the key issues to watch for:
Poor Location Choice
- Too close to buildings
- Poor drainage areas
- Insufficient space for drain field
- Proximity to water sources
Improper Tank Sizing
- Undersized for household needs
- Inadequate reserve capacity
- Not accounting for future needs
Installation Errors
- Insufficient depth
- Improper slope
- Poor compaction
- Damaged pipes during backfill
Drain Field Problems
- Inadequate size
- Poor soil preparation
- Improper distribution
- Insufficient ventilation
Essential Installation Requirements
Local codes and best practices exist for good reasons – they ensure your system works properly while protecting public health and the environment. Understanding these requirements helps you work effectively with contractors and ensure your installation meets all necessary standards. Here’s what you need to know:
Setback Distances
- Property lines: 10-20 feet
- Buildings: 10-25 feet
- Water wells: 50-100 feet
- Water lines: 10-25 feet
- Streams/lakes: 50-100 feet
Tank Installation Specs
- Proper depth (typically 1-4 feet)
- Level placement (within 1 inch)
- Correct inlet/outlet orientation
- Proper venting
- Accessible cleaning ports
Drain Field Requirements
- Correct pipe slope (1-2 inches per 100 feet)
- Proper gravel depth
- Adequate separation from water table
- Even distribution design
- Appropriate soil conditions
Choosing a Contractor
Your septic system is only as good as the contractor who installs it. Finding the right professional requires understanding what to look for and what questions to ask. This critical decision affects not just the installation quality but also your peace of mind throughout the process. Here’s your guide to selecting the right contractor:
Look for:
- Licensed and insured
- Experienced with local conditions
- Good references
- Written warranties
- Detailed contracts
- Clear communication
- Knowledge of local codes
Red flags:
- Significantly lower bids
- No permits or inspections
- Rush installation timeline
- Limited references
- No written guarantee
- Poor communication
Maintenance After Installation
A new septic system is like a new car – it needs proper care from day one to ensure optimal performance and longevity. Understanding maintenance requirements helps you protect your investment and avoid costly repairs. Here’s your maintenance roadmap:
First Year:
- Regular inspection of system operation
- Monitoring for settling issues
- Checking for proper drainage
- Establishing vegetation
- Documentation of system location
Long-term:
- Regular pumping (3-5 years)
- Annual inspections
- Maintaining records
- Protecting drain field
- Water conservation
Signs of Installation Problems
Catching installation issues early can save thousands in repairs and prevent environmental damage. Knowing what to look for helps you identify and address problems before they become major headaches. Here are the warning signs that should prompt immediate attention:
Watch for:
- Slow draining fixtures
- Sewage odors
- Wet spots in yard
- Backing up systems
- Gurgling sounds
- Lush grass over system
Improving Installation Success
Success in septic installation isn’t just about following basic requirements – it’s about implementing best practices that enhance system performance and longevity. These strategies help ensure your installation exceeds minimum standards and provides optimal service. Let’s explore how to achieve the best possible results:
Site Preparation
- Proper soil testing
- Accurate elevation measurements
- Clear access paths
- Protection of existing utilities
- Erosion control measures
Quality Materials
- High-grade pipes
- Proper gravel size
- Quality filter fabric
- Durable risers and lids
- Appropriate venting materials
Professional Installation
- Experienced crew
- Proper equipment
- Careful handling
- Accurate measurements
- Thorough documentation
Future Considerations
Today’s septic installation decisions affect tomorrow’s options and opportunities. Planning for the future while meeting current needs helps ensure your system remains viable and valuable for years to come. Here’s what to consider for the long term:
System Expansion
- Plan for potential home additions
- Allow for backup drain field
- Consider future regulations
- Document system components
- Maintain accurate records
Technology Updates
- Smart monitoring systems
- Advanced treatment options
- Improved filtration
- Better distribution methods
- Enhanced maintenance tools
Environmental Impact
- Groundwater protection
- Soil conservation
- Efficient water use
- Proper waste treatment
- Environmental monitoring
A successful septic tank installation requires careful planning, quality materials, professional installation, and proper maintenance. By understanding these aspects and working with qualified professionals, you can ensure a long-lasting and effective system for your property. Remember to always comply with local regulations and maintain proper documentation of your system for future reference.
The investment in proper installation will pay dividends through reliable operation, reduced maintenance costs, and protection of both your property value and the environment. Regular maintenance and careful use will help ensure your system provides decades of reliable service.
SOME COMMONLY ASKED QUESTIONS ABOUT SEPTIC TANK INSTALLATION:
Q: How long does a septic tank installation typically take from start to finish?
A: The complete process typically takes 3-8 weeks, including permitting and inspections. The actual physical installation usually takes 5-7 working days, but weather, permits, and local regulations can affect timing.
Q: Can I install a septic tank myself to save money?
A: While technically possible in some areas, DIY installation is not recommended and often illegal. Most jurisdictions require licensed professionals due to the complexity of the work and potential environmental/health risks. Improper installation can lead to costly repairs, environmental damage, and legal issues.
Q: How close can a septic tank be to my house?
A: Most local codes require septic tanks to be at least 10 feet from your house, but this can vary by location. The drain field typically needs to be 20+ feet from the house. Always check local regulations as requirements vary significantly by region.